Trimmed Corners and a Tip!
Posted by Gerri Robinson on
I hope what I'm about to share with you will encourage and inspire you to hold on to all your trimmed corners when making Flying Geese or Quick Angled Rectangles from the Stitch and Flip Method I use in ALL my designs.
Why?

Need I say more?
Before I go any further on the gorgeousness of the above design, let's step back on where it all began.
WARNING!!! This is a LONG post but so WORTH your time! I PROMISE!
Do you remember these quilts? I originally talked about them in this post here!

They are (3) of the (6) layout designs from my Twist and Turn Pattern Booklet.

The blocks are very simple and use my favorite Stitch and Flip Method.

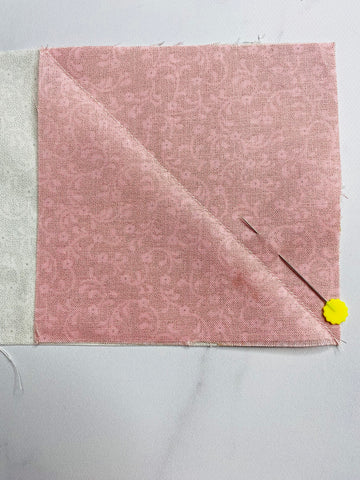
Here's the TIP I want to share with you. In my pattern I write, DRAW a diagonal line, corner to corner, on the backside of your print square.
INSTEAD of drawing a line, PRESS your print square (right sides together) to create a sharp crease instead of the drawn line!

Place your PRESSED square on the corner of your background rectangle and STITCH just on the other side (toward the pin in the upper corner) of the PRESSED crease.
Please NOTE: Pins are shown for ILLUSTRATION purposes only.


Please PARDON the change in fabrics used - its called "running short on time". The concept is still the same. Just visualize the same color print is used throughout this entire process. Thank you so much for your understanding!
AFTER you've stitched just on the other side of the PRESSED crease, TRIM 1/4" from your stitch lines (again, Pin is for ILLUSTRATION purposes only).

Saving the TRIMMED corner
now PRESS the print square open to the upper right corner.

giving you a Quick Angled Rectangle. Simply REPEAT the above steps on the left for a Flying Geese!
From your TRIMMED CORNER, stitch 1/4" on the diagonal side and PRESS open. (PIN is for illustration purposes only)

Creating a HALF SQUARE TRIANGLE from your Quick Angled Rectangle TRIMMED CORNER!
These (3) quilts (below)

created enough TRIMMED CORNERS

to create A LOT of Half Square Triangle

to create this beauty! Its' true!


I sent all the TRIMMED CORNERS to my quilting friend, Diane Merritt and asked, IF IF IF you're feeling up to it, can you stitch these up into a quilt? Diane NEVER disappoints!!!!
Never in my wildest dreams did I imagine a quilt this gorgeous would be created! I would LOVE to live inside Diane's brain to see how she creates!
I PROMISE you, the above design was created using ONLY the TRIMMED CORNERS from the (3) Twist and Turn designs above, I PINKY promise!
Are you thinking twice about tossing your TRIMMED CORNERS? I hope this post inspires you to think twice before you toss!! You never know the beauty you can create from RECYCLED or UP-CYCLING your "scraps".
Here's a quick link to all the items in this post:
Fabrics: Floret
Pattern: Twist and Turn
Let me know in the comments below if you save your trimmed corners and if you found this to be a valuable tip you'd use too.
Happy RECYCLED Quilting!
Gerri

I always save my trimmed corners. Eventually I am inspired and make something fun out of them. Sewing the pair together right away is key in storing them before you make something. 😉
Where can I find your book Twist and Turn? I do save all my little scraps to make crumb quilts, but I just love your idea with the corners.
You’re right it was totally worth the read! Great post! I always save my bonuses HST from my flying geese! Thanks for inspiration!
Thanks so very much
I learn so much from you
I’m retired and just starting my quilt piecing journey and I so enjoy your site, blogs, and beautiful quilts!
The quilt is gorgeous! I have saved my trimmed corners for over 15 years after a friend shared what she did with hers. From the HSTs, I have created “babies” that make great companions/coordinates to the original quilts. I love playing with the HSTs in designing something new. In fact, many of my quilting friends ask if I want their trimmed corners. :)